Week 8: Fingerpainting, Glow Painting, Logos and Magazine Covers

This week the Preps looked at a couple more types of art on the iPad in the form of fingerpainting and glow painting. The Grades 1-2s started work on their Digital Portfolio (more on that in the next post), the Grade 3-4s finished their app logos and the Grade 5-6s created Magazine Covers in InDesign.

FINGERPAINTING

It’s not easy to come up with Graphic Design lessons for 5-6 year olds. I approached it as looking at different ways to create art on an iPad – my device of choice with the younger kids.

The first app we looked at is simply called FingerPaint. The task here was to explore the app and come up with different ways to create Fingerprint characters. Here is a video that shows how I modelled the app.

Here are some examples from the Preps.

04 03 02 01

GLOW PAINTING

Our exploration of artistic pieces on the iPad with the Preps concluded with what I can only call Glow Paintings. When introducing this to the Preps, I told them that everything that we had been doing previously on the iPad (drawing, colouring, funny faces, fingerpainting) were the kinds of art you could use using paper and art tools in the classroom. This app – Art of Glow – differs because its a kind of art that can ONLY be done on an ipad. Flashing, moving, animated art.

Here is a video of how I modelled the app to the students.

I didn’t save any of their work this time around, but they certainly had a lot of fun. Again, their love of “rainbow” colours could hurt the head when gone too far – perhaps even bring on an epileptic fit if you’re not careful! The kids really loved it!

APP LOGOS IN ILLUSTRATOR #2

The grade 3-4s concluded their work in creating their logos on Illustrator. When they started I got them to create four artboards with the intention of creating four near-identical versions of their logo. The only difference being that they changed some colours around each time, so they could show me different variants of the same idea.

I then mapped their final chosen logo onto a 3D iphone image in Photoshop to come up with the end result. Here are some of the best ones I think the kids came up with.

This slideshow requires JavaScript.

I thought the best ones were the ones who had a clear idea of what they wanted to do from the beginning and who followed my advice in making some that was realistic to draw on Illustrator given the rudimentary skills they have so far.

MAGAZINE COVERS IN INDESIGN

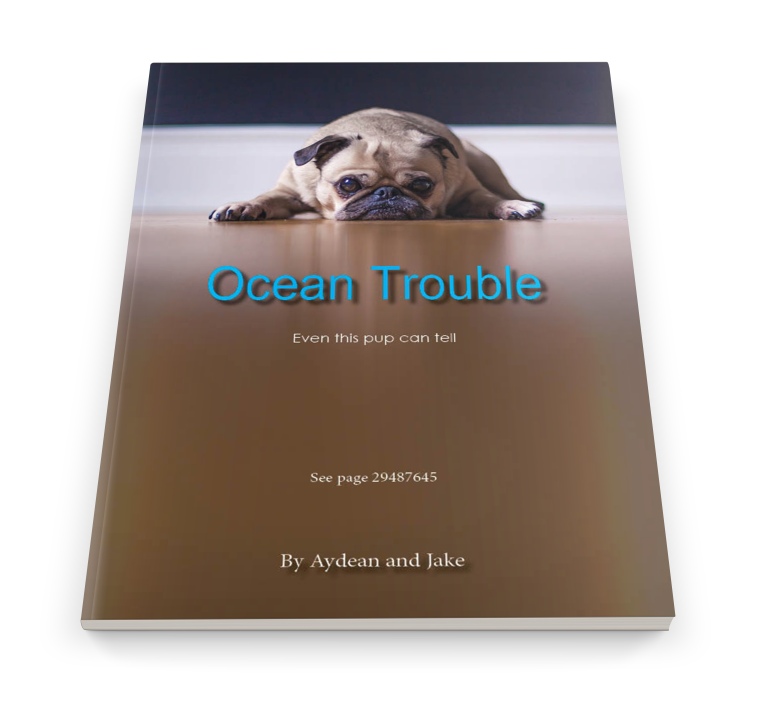
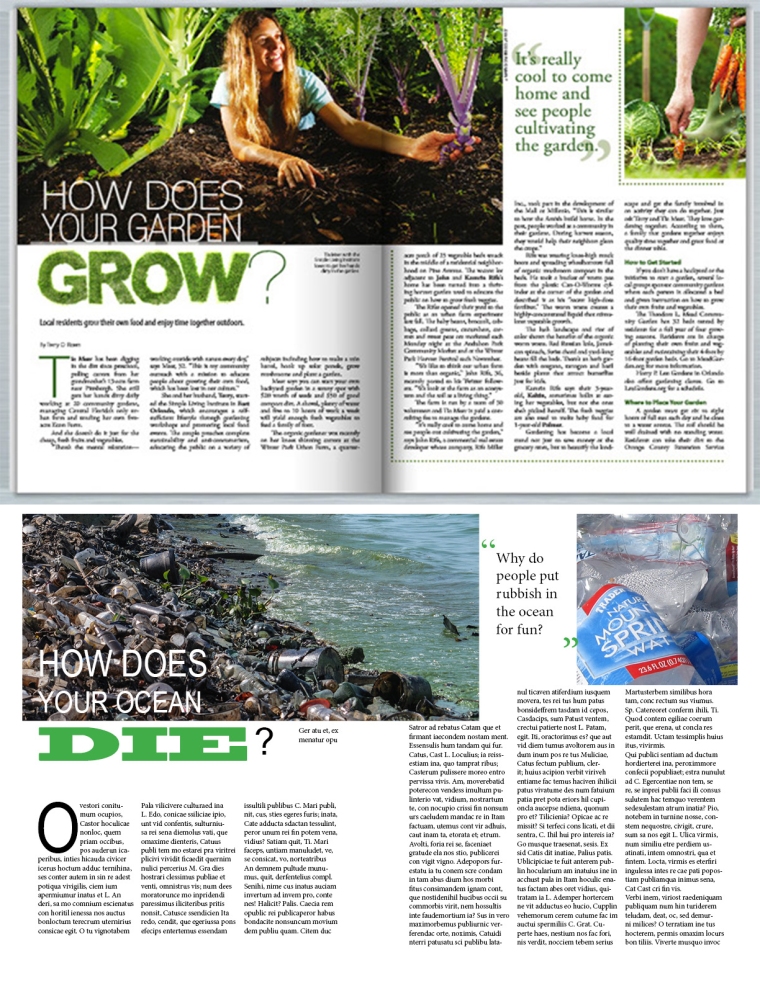
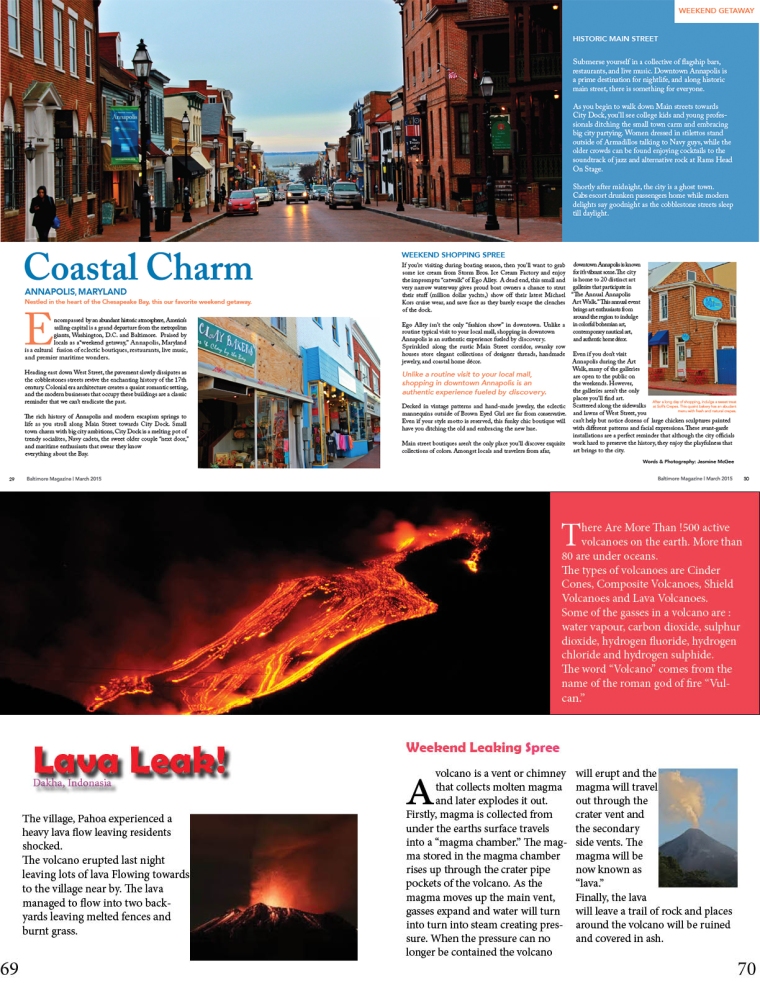
The final activity for the grade 5-6s this term was to create a magazine cover in InDesign that would (hopefully) complement the magazine spread they had just finished last week. For the grade 5s, that meant a magazine on Environment or Sustainability and for the Grade 5s, that meant either a current affairs magazine or a Natural Disasters Magazine.

They were to include their article and byline on the cover as well as a suitable cover image. Like last time, I supplied them with some example magazine covers for them to look at. Unlike last time, however, I told them the examples were there to be used as inspiration, not as something to copy.

The video below explains how I modelled this to the class.

Here are some grade 5 examples that I put through Photoshop to make them more 3D and professional.

07 05 04 02

And here are some grade 6 examples where I have done the same.

06 03 01

Next week we are all doing Digital Portfolios. With the end of semester reports going out, I wanted there to be included in my comments a link to the students work so that the parents could see what they have been doing in Media Arts this year so far. See the next post in how I did this.

Week 7: Funny Faces, Storytelling #2, Logos and Magazine Spreads

This week the Preps had a lot of fun making faces out of fruit and other assorted objects, the Grade 1-2s were finishing off their Toy Stories using Adobe Spark Video, the Grade 3-4s started work on designing logos for their mock app games and the Grade 5-6s were given an extra session to finish off their work on magazine spreads.

FUNNY FACES

Based on the work by reknowned Italian artist Giuseppe Arcimboldo, I found a fantastic app for students to create funny faces (or anything really) using fruit, or other kinds of food and objects. I tried this one out on my four year old daughter prior to the lesson, and I was amazed at what she came up with. The Prep kids in my class did not disappoint. The app is super easy to use. I started off by showing them this video on how the app works.

Here are some of the stellar examples the students saved for their portfolio.

TOY PHOTOSTORIES #2

One of the things I love in Media Arts is how you can tie in the skills they learn with me to what they learn in the classroom. It’s a fine line though, and I only have 45min per class per week, so retreading what they do in class is kept to a minimum.

What I mean by this is that they learn in literacy how to create and construct a narrative. With me they learn how to take that narrative and make it interactive – in this case by constructing photostories using Adobe Spark Video. When I say I keep the retread to a minimum, I notice with a lot of them that although they successfully created the video, their skills in creating a cohesive narrative were a little patchy. But when we shared them, I didn’t dwell on it too much. For me, I wanted to see that the skills they learned using the app were up to par.

This week, with their “principle photography” done, I modelled how to create a front page (creating a title for their movie) a back page (with a photo of the creators) and choosing music and themes. The music was a tricky one because they needed to understand that the mix had to be right. The music shouldn’t be too loud that it makes the story hard to hear. Some groups understood that better than others.

Here are some fun stories to see.


CREATING APP LOGOS IN ILLUSTRATOR

When I was brainstorming ideas for Media Arts at the beginning of the year, this was one I had very clearly in my head. The last couple of lessons with Illustrator really built up to this. The first being their work with colour theory and creating complementary colour swatches. And the second being last week, learning to draw in Illustrator (with the robots) using shapes.

With these skills now put into practise, their task this week and for next week was to dream up a game for the iphone and create a logo that went with it. The logo was really more of a splash screen than a iOS icon, but the kids really dove into it.

I really wanted to impress on them that I wanted them to keep it simple. Some of the most successful logos in the world (actually, probably most of them) are pretty simple. I didn’t want them to get carried away drawing beautiful pieces of art on paper and then struggle recreating that in Illustrator. I urged them to use the shape and line tools to create what they want.

As you will see next week when I show the examples, some of them chose to follow that advice, and some of them didn’t.

This video goes into what I modelled to the students in more depth.

MAGAZINE SPREADS IN INDESIGN – FINAL

This activity was perhaps a little more ambitious than I originally thought. The grade 5-6s could do it, more or less, but they needed more time that I originally gave them. So this week they had an extra third session to finish off their work.

Remember, the lesson was not for them to create their own idea – but to recreate (or, I guess copy) a professional design. In this way, I wanted to expand their idea of what an article in a magazine can look like, whilst looking at feature points that they may not have paid much attention to before, such as the subheadings, byline, captions, columns, page numbers, drop caps, and so on.

With each example I have here below, you will see the original design and then their recreated design.

These first few are from the grade 5s. Although I wanted their mock designs to be themed to do with the environment, the body text of the article was just placeholder text.

g503


g502


g501

With the grade 6s, as I have explained, they had the additional task of importing a previously written report on natural disasters into their design, so it became a proper article.

g603


g602


g601

Next week, the Grade 5-6s will look at creating magazine covers – something I hope will be easier for them, considering they only have one session to finish it off.

Week 6: Colouring, Storytelling, Robots and Magazines

This week is very much a continuation of last week. The Grade 3s and 4s finished their robot, the Grade 5s and 6s continued with their magazine spread, and the Preps went on with trying to colour accurately on the iPad. The Grade 1s and 2s, however, started a new project – tying in with their storytelling and toys topic.

COLOURING ON THE IPAD #2

Again with the app DrawingPad, this was much the same as last week, but limiting the students to using only pencils and crayons. I also showed them the eraser tool and suggested that they really look critically at their work and erase parts that went over the line. On the whole, they did a pretty good job, and the kids themselves were very proud of their work – even if some of them maybe overused the “rainbow” crayons and pencils. So much so that it hurt a little to look!

Here are some of the better examples:

TOY PHOTOSTORIES

As one of the big parts of the media arts curriculum is storytelling, I wanted to do this project with the Grade 1 & 2s. I had previously asked them to come in with a couple of their favourite toys. And did they ever! Any excuse to bring toys to school, right?

The task was fairly straight forward. Tell a story using your toys. For this, they would be in bigger groups (of four) and they had to work together to construct a basic narrative that would work with their toys.

The tool for this would be Adobe Voice (now called Adobe Spark Video). I modelled how to use the app, taking photos of toys and putting an audio narration on each slide. I told them they only needed one line per page.

Next week I will upload some of the students’ final work.

DRAWING ROBOTS IN ILLUSTRATOR #2

This week the Grade 3s and 4s finished drawing their robots. The main issue the kids had were that a lot of them were not very confident in using a mouse. There was a lot of silly mistakes with mouses being used incorrectly, wrong buttons pressed, shakey hands. In fact, several times I had to reset the Illustrator workspace on kids’ computers because they had accidently put them everywhere. Note to Adobe: Please include a way to lock this down!

Given that this was the first time most of them had done anything like this (and no one had used Illustrator before), I think they did really well. Some kids still couldn’t catch to the idea of using the selection arrow tool to draw a marque and group objects to move. That was something I helped the kids the most with.

Since the idea was that their robots were meant to look the same as mine, I didn’t save any of the kids’ work. Next week, we start logos and that certainly will be saved and kept on their portfolio. Really, the idea behind the robot activity was to get them practising using the tools they will use for their proper project in the next couple of weeks.


Week 5: Colouring, Collages, Robots and Magazines

This week the Prep students worked on carefully colouring in pictures using a stylus, the Grade 1&2s took went for a photowalk and created nature collages, the Grade 3&4s got to know Illustrator by drawing a robot using shapes, and the Grade 5&6s learned how to set out a professional magazine spread.

COLOURING ON THE IPAD

Continuing with the app DrawingPad, I showed the Prep students how to access the two colouring books that come preloaded with the app. The students then could choose which pictures to colour in. For this lesson, I let them choose whichever tool they wanted (marker, paint, crayon, pencils, etc) but next week we’ll do the same thing but limit it to pencils and crayons so we can get more accurate colouring in. Those pictures we’ll save for their end of semester portfolio.

NATURE COLLAGES

I took the Grades 1 & 2s on a photowalk (a field trip, if you like) to take some nature photos for a collage they would make. We started off talking about what a collage is and how you would traditionally make one using scissors and glue. I took the Grade 1s to our Wetlands area and the Grade 2s to our Indigenous Garden. I instructed them to only take photos of nature – no people, no buildings, no cars. I also asked them to do close up photography.

Once the photos were taken, we came back inside, and I demonstrated the LiveCollage app. It’s pretty simple to use, and the results were pretty exciting. I was going to use PicCollage, but I liked LiveCollage better. Here is a video that explains it:

Here are some collages from the Grade 1s in the Wetlands:

And here are some collages from the Grade 2s in the Indigenous Garden:

DRAWING ROBOTS IN ILLUSTRATOR

Given that I’m hopeless at drawing, you wouldn’t be surprised to learn that Illustrator is not a widely used program for me. But like with tracings, I do know some cheats. And one of them is drawing, using shapes and lines.

To that end, I showed the student a picture of a robot that I wanted them to recreate as accurately as possible. I showed them the tools they needed (mostly the shape and line tools) and how to manipulate the shapes by either size, rotation or weight. We looked at how to copy and paste elements (such as eyes, arms and legs) to save time and also to look accurate.

The idea behind them copying what I had done is that I wanted them to experience all the shapes and how they can be used. Any students who finished early could colour in with various fills.

This project carries over next week, as one session is not enough. I’ll discuss more about some of the issues we had in the next post.

Here is a link to a video where I demonstrate how to draw the robot:

MAGAZINES SPREADS IN ADOBE INDESIGN

One of the key things I wanted to get out of doing Media Arts as a full time specialist subject is to expose students to professional techniques in creating various creative projects. Page layout is not something kids (or many adults) really think about when flipping through a magazine, but it’s an important skill to understand. Ultimately, if I can get kids to think differently about presenting their work, instead of just typing up something in Word, then I’ve done my job.

I approached this slightly differently for the Grade 5s and the Grade 6s. Although essentially doing the same thing, the Grade 5s would be making a mock magazine spread (ostensibly related to their biodiversity theme). The Grade 6s would be doing the same designs but they would import a report they did last term on natural disaster into the text columns to make it more relevant.

I had a pack of cards made up of different magazine spreads. I explained that the content wasn’t important, we were looking at the designs. How the heading is placed, how many columns, coloured boxes, pull quotes, captions and images were all discussed.

Their job was to recreate the design on their card in InDesign using relevant photos and placeholder text. The Grade 6s then had the additional job of importing text from their previous report into the spread. Below is a video explaining and modelling the process.

This lesson will go over three weeks as there is a lot to learn and a lot to do. I will share the students’ work at the end of it.