Adding Subtitles to Star Wars (Gr3-4)

It was about this time last year when I found out I was going to take on the Media Arts specialist role. So many ideas were running through my head. What tools, what equipment and mostly – what projects should I do?

This one is the first one I thought of. I’m not saying it’s necessarily the best project we’ve done all year, but it was a lot of fun.

Essentially, I wanted to teach the students how to add subtitles to a video project. So there’s your learning outcome. My way to engage them was to use Star Wars. I remembered years ago seeing a clip online where someone put their subtitles on a sequence featuring R2D2. So, simply – what is R2D2 really saying? A fun idea – yes. But one that takes a lot of planning, both from the teacher and the students.

The clip I used, which I found on YouTube and downloaded, was the start of Revenge of the Sith where Obi Wan and Anakin are flying around, trying to get in the command ship to free Chancellor Palpatine. Yes, I knew all of that without looking it up! There are some moments where R2 says somethings, but in the history of Star Wars cannon, the movies never subtitle R2. Other characters sometimes know what he’s saying, but you as the viewer do not. So, I had a think and came up with this video.

I’m not claiming it’s all that funny, but that was fine because I challenged the kids to do better. I gave them, in the first session, a planning sheet where I had transcribed the whole sequence, added timecodes to each line of dialogue, and left a blank space everytime R2D2 beeped and whistled. I even left a space for the enemy droid ship who said something mechinical before firing his missiles.

So, after watching the sequence a couple of times, the kids had to basically fill in the blanks as to what R2D2 was saying at each point. Of course, as you’d expect, there were some students that I had to temper their enthusiasm a little as what they suggested was borderline inappropriate, but for the most part, the kids got into the spirit of it. Even those who had no real interest in Star Wars.

The secondĀ and third session was the real challenge. The process of adding subtitles (or captions, as Premiere Pro calls it) is fairly simple, but easy to mess up. Below is a video of me explaining how I added subtitles to my Star Wars clip.

I was strict with the kids on using proper capitalisation and punctuation. I helped out when it came to spelling. I also made them check, and re-check their timecodes so that they matched what I had on the sheet.

The results were mixed. I’m not a comedy critic, but I do think my version was better than some of the kids, but most did a very reasonable job. And all students, at the end, had a much greater understanding of subtitles, theirĀ various purposes, and the technicalities of where and how they are placed in a video clip.

This was the last project I did with the Gr 3-4s. I will post a reflection on the Gr 3-4 curriculum over the summer break.

Shooting and Editing Music Videos (Gr 5-6)

Wow, this was a tough one. This project ended up ok, but didn’t happen as I originally intended. Let me explain.

The whole point of getting students to shoot and edit their own music videos, was to teach them the technique of “multicam editing”. This is the technique where multiple cameras are used to shoot a scene (let’s say, a close up, medium shot and wide shot) and the editors in Premiere Pro would sync each clip together (usually with a clapperboard sound or hand clapping) and then simply choose which clip to place in their video one at a time.

Here is a good video that explains the process.

I thought – and this shows my lack of education in this area – that i could adapt this by having the students in groups to have 3-4 different versions of them performing a song. Let’s say . . .

  • Version 1: Kids singing the song
  • Version 2: Other kids singing the song
  • Version 3: Kids dancing to the song
  • Version 4: Kids “acting” parts of the song.

They would need to play their song from an iPad off camera on a count of 1,2,3 – Go. That word GO is what would sync all the clips in Premiere.

Make sense? Well, sort of. What I came to realise is that’s not really what multicam editing is meant to be for. It only really works if mutliple cameras are shooting the same scene, as the name implies. Also, the kids would need to record each version for the entire length of the song. Most groups did not do that.

So, I had to backtrack a bit, after seeing what the kids filmed. We had to look at editing it in a more traditional way.

So, to set up this project, I got each group to nominate which song they wanted to do. I said that it had to be a song that the singers in the group knew very well. I assured them that we would take out the sound in editing, and sync the real song in it’s place – so, no need to feel self conscious. I also made it clear that they couldn’t lipsync the song. Lip syncing always looks incredibly fake. Obviously I had to vett the songs to make sure they were appropriate. Although the kids knew that meant no swearing or inappropriate content like sex, drugs and violence, they often would miss some of the more subtle innuendos in the song, in which case I told them they had to choose again.

musicvideo

I then put all the songs on iPads 1-6. These were the “audio” iPads. iPads 7-12 were my “video” iPads – the ones that the kids would use for filming. Again, the idea is that the audio iPad would be close to the video iPad, but off camera, with a countdown.

In explaining all of this, I showed them a cut down version of what I did.Ā I always say to the kids that I wouldn’t askĀ them to do anything IĀ would not do myself. So, on my own, I did do a (deliberately embarrassing) version of Pharell Williams “Happy”. I filmed the song four times, in this way.

  • Version 1: Singing standing up in one location
  • Version 2: Singing sitting down in another location
  • Version 3: Dancing to the song in yet another location
  • Version 4: Snapping my fingers to the song in yet another location

When I filmed, edited and explained this, it was still my intention to go the multicam route. If I had known that we would be editing this traditionally, I wouldn’t have bothered to film the entire song for Version 3 and 4. It wouldn’t be necessary. These two I call wild tracks, because it doesn’t matter where in the video you put them, it still works. Obviously the singing has to be in the right point in the song.

To my chagrin, here is my (cutdown) version of Happy.

So, after laughing hard for about 10 minutes, each class went out to do the filming. One group even went to the effort of bringing costumes for the shoot, which I loved!

It was once I reviewed what they had done that I realised that the multicam workflow was not going to work. Especially sinceĀ most students had not recorded full song videos for each clip.

So, for the next session, once all their videos were transferred to our school server, we could begin looking at how to edit this music video traditionally.

The first step was to sync the song to the video. This required students to listen out for that 1,2,3,go intro and put the song right at that point, muting the video audio at the same time. Then they had to look at other clips they had, and choose subclips at different points.

Here’s a video I made to explain the proceess. Please note, because I used the Pharell Williams song “Happy” I didn’t play the sound in the video below for copyright reasons

The whole project took 3 sessions, with the first being the shoot, and the last two being the edit.Ā Although the students did save the projects and export them as movies, we could not upload them to YouTube for their portfolios because of copyright issues with the songs themselves. This was the perfect opportunity to explain why copyright exists and the permissions needed to include other people’s songs on projects. We did save them and share them, though.

All in all, a challenging project that did need to be reworked, but the students had a lot of fun doing it.

Week 9 – Animate Me, Scratch Jr Pressure Test, Adobe Animate CC & Shots On Film Pt3

This week the Preps had more fun with Animate Me, the Gr 1-2s did a Scratch Pressure Test, I introduced Adobe Animate CC to the Gr 3-4s and the Gr 5-6s finished their Shots on Film project.

Animate Me #2

Well since the Preps were denied doing Stop Motion and doing Scratch Jr, for this last lesson of the term we went back on to Animate Me. In the interim between classes, I had coughed up the few bucks or whatever it cost to release the other characters and let the studentsĀ play around with them. Each character is different as far as how they move.

Again, I don’t have any examples, but I would recommend this as an easy to use animation tool that young people can get to grips with quite easily. They seem to have a lot of fun doing it.

Scratch Jr Pressure Test

Like the Gr 3-4s did previously, I set up the younger Gr 1-2s with a pressure test. They had 20 minutes to recreate the “recipe” I have them. Most of them did quite well and finished within the time, although I had put in a little obstactle they had to figure out.

As you see from the first page, there is a red block that tells the script to jump to the next scene. Problem is, you won’t see a block like that until you actually create the new scene. So it’s something you have to do in retrospect. It was about 50-50 between the kids who figured it out on their own, to the kids who got sent back after making their mistake and worked out what to do from there.

But the kids certainly had a lot of fun, and learned about some of the other blocks they hadn’t used before.

Adobe Animate CC

Previously called Adobe Flash Professional, Adobe Animate CC is the newly rebranded version of essentially the same program. There are of course some new tweaks (mainly in how it can be published) but most of the tutorials for Adobe Flash you see online could be adapted for Animate CC, and vice versa.

As part of my ethos to expose the students to real, industry standard programs, I wanted to give at least one session to exploring how the “adults” do it. I found this simple tutorial on youTube over at https://youtu.be/8eHfIIeoi0EĀ (which, bizarrely, is silent) and adapted it for my own class. As I said to the students, the bouncing ball animation is one of those classics you learn when you first start studying animation, so it made sense to do it here.

The concept of frame by frame animation was, of course, not new to them, so they just had to adapt to this new environment, which wasn’t hard. What was hard was drawing and then manipulating the oval “ball” so it looked as close to the sketch as possible. As I explained to the students as I went around helping them, its like anything – it takes practise.

Here is my tutorial of how I introduced Adobe Animate CC to the Gr 3-4s.

Ā 

Shots On Film – Part 3

For the final part of this project, we added titles (including a credit roll) and music and also got them to nest a sequence inside another sequence, which personally I always find useful in my workflow when the movie is all cut together, and you just need to add the titles and music. Initially, this was a bit confusing for them to understand, but when I explained they were “packaging” all their clips, lower thirds and effects into a “box” – the box being the new sequence, they got it just fine.

Here is my final tutorial on this part of the project.

And here are some examples of it all done! Very proud of my students getting it all finished like this!

That’s it for this term!

Next term, the Prep – Grade 4s will start their unit on Video Production (much of it will be similar to what the senior students did, I’m sure) and the Grade 5-6s will do some post production work with Premiere Pro, Audition and After Effects. Oh, and having fun with a green screen as well.

Until then . . .

Week 8 – Scratch Jr, Scratch and Shots On Film Pt2

Again no Preps this week. The Gr 1-2s were introduced to Scratch in the form of Scratch Jr, the Gr 3-4s finished their Scratch projects and the Gr 5-6s continued editing their Shots on Film projects.

SCRATCH JR

Scratch Jr is the simpler iPad version of Scratch that I have been working on with the Gr3-4s. This was definiately more appropriate for the Gr 1-2s. Again, like with the Stop Motion, I decided to hold off on this with the Preps. I feel that the majority of them are not developmentally ready to do anything on Scratch with much complexity. Nvermind, they’ll get their chance next year.

The interface is a lot simpler, but most of the functionality is still there. Again, like with the older kids using Scratch, I gave them a quick overview with a fun little presentation I did. You can find a recording of that down below.

Kids got a kick out of being given free range to play with the program and discovering what the blocks could do. I had a lot more questions from th 6-7 year olds than I did with the 8-10 year olds (naturally) but the kids learned very quickly and came up with all sorts of quirky animations.

Unfortunately one downside to the app is there is no way to publish the projects and share them online. I suppose this is a consequence of it being for younger kids, but it’s a shame that there is no way I can save these and put them on portfolios like I can with proper Scratch.

Next week, we will be doing a Scratch pressure test, just like I did with the older kids last week.

SCRATCH – THE FINAL PROJECT

So this week the students in Gr 3-4s finished their Scratch projects and sent me the link. One of the problems of the students working in pairs – as the number of devices dictates – is that when they share a joint project, you can never be really sure how much was done by one (if any). Certainly, there are a few students who are more than happy to sit back and let their partner do all the work, and I have made notes of those students and might mention something in their report comments about needing to be more actively involved, but for most students, this isn’t an issue. Sharing the devices equally can be a bit of a challenge for the younger kids who are still learning their social skills, but most do it quite amicably.

In any case, here are a couple of stand out examples that I thought I would share.

//scratch.mit.edu/projects/embed/118995185/?autostart=false
//scratch.mit.edu/projects/embed/118812067/?autostart=false

Shots On Film – Editing Part 2

In part two on this unit of editing their Shots on Film project, students were asked to import their Photoshop file as individual layers and match them up in the sequence with their corresponding clip. Once that was done, they had to add transition effects. The second part of the tutorial is here below:

Next week, the students will finish it off and add titles (including rolling credits) and music. They will also learn how to nest a composition inside another composition. Sounds complicated? We’ll see . . .

Week 7 – Stop Motion, Scratch and Shots on Film Pt1

Due to a whole day School Concert rehearsal, I didn’t see the Preps this week. The Gr 1-2s had a second go at doing the stop motion photography, the Gr 3-4s started work on their final Scratch project and the Gr 5-6s learned how to create Lower Thirds in Photoshop to bring into their Premiere Pro project.

Stop Motion #2

After having the discussion with the students last week about how to safeguard against having hands (or other extraneous body parts), we reviewed it this week and I modeled how you can work carefully and how you can edit out photos that accidentally have something in it.

The students really took it to heart, and we shared some really fun stop motion animations. We all agreed that if you had a movie that had nothing in it that spoiled it, the illusion works very well. Most movies the kids made didn’t have any particular story to it or anything, but some did and I was very impressed with the imagination and how – with just a couple of small unrelated toys, kids could dream up a universe!

Here are a couple of examples:

Scratch – Final Project

Originally, this was going to be a one lesson thing, done and dusted. But by the end of the first class, the kids begged for another session to finish it off. With such passion and excitement, who was I say no?

There was very little instruction needed. They could build a Scratch project on whatever topic they wanted, with whatever characters. They had (now) two lessons to complete the whole thing, publish it and send me a link.

Like the digital portfolios we did at the end of last term, I had set up a basic Google Form that the students would fill out when they were done, that included fields for their names, class and a space for them to paste the link for their project. This gets imported into a nice Google Sheet that I could then have to refer to when we get to adding to their digital portfolios at the end of the school year.

Next week I will share a couple of examples of what the kids made up.

Shots On Film – Editing Part 1

In this lesson, the Gr 5-6 students learned how to create lower thirds in Photoshop (in one file) and then import their clips and the Photoshop file into a new Premiere project. This is following on from the video they shot last week with the examples of shot compositions. The task was for the students to create lower third “labels” that will match the different shots they took and marry them together in Premiere Pro.

Here is the first of three videos where I talk about this project and what I got the students to do.

Next week. the Gr 5-6s will continue their project and add transitions, titles and music to their project.


Week 3 – Sticknodes, Basic Animation in Photoshop and Editing with Premiere Pro

This week the Prep-Gr 2’s used an iPad app called Sticknodes, the Gr 3-4s looked at how you can use Photoshop to create animations, and the Gr 5-6s were introduced to Premiere Pro in order to create trailers for their videos.

Sticknodes

The first thing you’ll notice about Sticknodes is that it is virtually identical to Pivot Animator, and that is true. I’ll admit, I haven’t dived deeply enough into the app to see where the differences lie, but this was a good way of doing the same lesson that I had done with the older kids – using Pivot Animator – to the younger kids using the iPads.

The more I think about, the more I am grateful that I decided to stick to the Prep-Grade 2’s on iPads from the beginning of the year. I find that, even with the Grade 3-4s on desktops, the skill of using a mouse accurately and non destructively has been quite poor. I’ve had students moving files orĀ entire folders by accidentĀ andĀ not being able to double click properly. This is what you get in a world of touch screens and touch pads.

Anyway, even the kids as young as Preps could understand the concept of frame by frame animation by using this app. Although I did notice that, without guidance, the movements between each frame can be quite big, causing the animation to flash figures on screen, rather than create an illusion of movement (I mentioned this in the previous post). I let it go with the younger kids, but I did make sure that with the Grade 2’s at least, that I had higher expectations.

This week we just used the stick figures in the app. I didn’t mention the other figures available in the library. Next week we will consolidate our skills and understanding using the app, but with more choice of characters.

Here is a grade 1 example

Frame-by-Frame Animation with Photoshop

Little known fact about Photoshop – you can edit videos and create frame by frame animations as well as the normal image editing and composites. It’s not a fully robust video editor like Premiere Pro, but it gets the job done for basic projects.

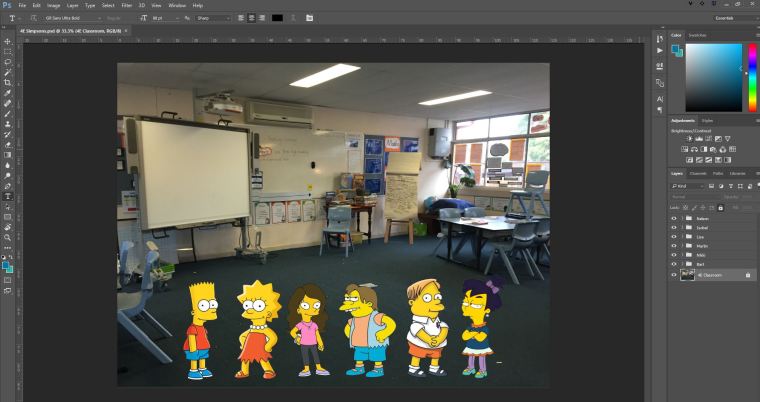
I had some fun with the grade 3-4 classes. I sneakily took photos of their empty classrooms during lunchtime, and created a Photoshop file that had the classroom as the background, but then added layers which had Simpsons characters. Within Photoshop it looked like this.

ps

The idea was that the students had to activate the timeline, choose frame by frame animation, and move their characters around, a little bit each frame.

Below is a video tutorial of what I did.

The students were highly engaged with this activity, as you can imagine. There were some things that came up. Firstly, the kids noticed that the animations were quite limited.Ā In other words, you couldn’t move any of the parts of the characters around, just the characters themselves. I knew about this, of course, and assured the kids that in the next lesson we would look at how to achieve something a little more functional.

The second thing is that, like with the Sticknodes, some kids followed the instruction of moving a little at a time, and some didn’t. Those that didn’t tended to do very random animations of characters just flashing about everywhere.

As noted in the video, about half way through, I did call them back to the floor to show them “tweening”. That process of creating a start and end point, and letting the computer fill in the gaps in between. ThisĀ changed their world and suddenly doing the animation was a lot less tedious. To be honest, I wasn’t too concern with the quality of the animation. I was more trying to get them to understand the process and skill. We can finesse their animations later on.

Here is a couple of examples of what the kids did. You can see where the ability to tween came in!

Next week we will animate a single character in Photoshop using the Puppet Warp feature.

Creating a Trailer in Premiere Pro

Originally I had planned that I would get the grade 5-6sĀ to edit the video they did last week with Screencast-o-Matic. But I decided that a good way to introduce them to Premiere was to cut together a 30 second trailer from that video using clips, titles and music.

Aside from Premiere, a fantastic resource I used and shared with the students is the YouTube audio library. Not many people know that YouTube provide royalty free music and sound effects free of charge to download and use in projects.

Here is a two-part tutorial about how I modelled this process to the students. Note that, of course, we could spend a long time being picky about what clips to show or what transition matches which audio beat, but really it was just an introduction to some features and skills in Premiere Pro.

Here are a couple of examples.

I think their favourite thing was to choose the music. They got a kick out of that.

Next week we dive into learning about shot compositions and filming examples of different kinds of shots.