Week 7: Adobe Voice, PhotoshopMix #3 and Composites in Photoshop #2

This week, the Prep class were introduced to a new app for them – Adobe Voice, the Grade 1-2s continue with PhotoshopMix to complete their “Think Board”, and the Grade 3-6s finished their work on their composite project. As usual, I’ll start with the Preps, then on to PhotoshopMix and finally the Photoshop composite project at the end of the post.

ADOBE VOICE

Adobe Voice has been around for a couple of years now, and I absolutely love it. I love it because of how easy it is to use. When I introduced it to the Prep students, I said it was like making a book on the iPad, but instead of words and pictures, we have sound and pictures and each “page” the student needs to record their voice.

I’ve used it in my past life as a generalist classroom teacher to great effect. Its been great as another format to publish or tell a story, and it’s also been especially useful with students with disabilities in telling their story in a way they understand and can handle. In this case, I wanted to present to the younger children a way to “tell” their story without having to write words. Enter – Adobe Voice. This week was really just about getting the kids to play with it. I explained how it worked. I explained how to record lines for each page and how to find (or take) photos.

Next, we will revisit Voice and look at doing projects where they talk about themselves and their families.

PHOTOSHOPMIX THINKBOARDS #2

I was pleasently surprised this week how easily the grade 1/2s coped with what they had to do. Essentially the students were asked to “fill” their thought bubbles with images found in Google. I explained how to go into Safari, find the picture they want and press/hold their finger on the image until the popup comes up asking if they want to save their image. Once they had enough images, they were to go back into their project in PhotoshopMix and create new layers for each picture and pop them in. Once in they could resize and rotate the images to get their best fit.

I was on hand to help spell any words they found tricky (they are 6-7 year olds, after all), but aside from that, they need very little help, and many groups actually got to finish early. One thing I didn’t realise until teaching the first class – PhotoshopMix seems to limit the number of layers you can have in a composite to 5. So the kids could only choose three pictures (since the photo of them and the background image were two images already in.

The grade 1s were asked: What pops in your head when you think of Healthy Choices? The grade 2s were asked: What pops in your head when you think of Communities? Both topics were covered extensively in their classrooms, so they had some ready made ideas. I told the kids that I would print them out for their teachers and they had to explain to their teachers why they chose the images they did.

Here are some examples of grade 1 posters on healthy choices.

This slideshow requires JavaScript.

And here are some examples of grade 2 posters on communities.

This slideshow requires JavaScript.


PHOTOSHOP CC – CREATING COMPOSITES #2

This week the older students finished their work (most of them) on composites. They did a reasonable job selecting the background and deleting it. Today I ran through with them how to copy and paste from one file to another. Then how to use Free Transform to scale, move and rotate it in position. You can see that, for the most part, its almost exactly the same skill set that the grade 1/2s were using this week on the iPads.

The lessons went off without a hitch. The ideas came out, more or less, as planned. There were a few tweaks that I suggested here and there; as well as some students asking how to do various things (such as a colour overlay, transparency, etc.).

The results were inspiring, to be honest. I can teach the skills and how to use the tools. I can go through with them best practise. But the ideas, the creativity – that’s all them.

Here are some of my favourites.

That’s the last week. It was a short term 1, this year. Next term will be 12 weeks (ouch!) but that does suit perfectly the idea I have of stretching out Design. More to be revealed later.

Next week, due to other commitments, I’ll only be teaching grade 3 and grade 5. We’re going to be doing the Photoshop Filter Challenge. Stay tuned for next week!

Week 5: Prep Photography, PhotoshopMix and Selections in Photoshop

This week, the Prep class began experimenting with the camera on the iPads, the Grade 1-2s used the iPad app PhotoshopMix to create simple composites, and the Grade 3-6s continued with Photoshop, learning how to select a background to cut out. I’ll start with the Preps, then on to PhotoshopMix and finally Photoshop proper at the end of the post.

PREP PHOTOGRAPHY #1

This week we started a two lesson unit on using the camera on the iPad app. The students all come with various experience levels of using a camera on a device. Most have done it in some way before, and those who hadn’t, picked it up quite quickly.

We discussed looking for the perfect shot, tapping the shutter button (rather than holding it down in burst mode), checking your photo and coming back into the camera.

I let them around the studio, as well as the library next door, and let them take whatever photos they wanted. An issue I had, was that often the cameras were set to Video or Slow Mo or one of the other settings, and because a lot of them are pre-readers, they couldn’t tell the difference. Although, most of them COULD tell that they were taking video rather than photos, and asked me to fix it for them. But definitely something I had to keep in mind.

From there, I got the kids to come back on the floor. I told them I wanted them to choose, out of all the photos they took, one favourite they wanted to share with the class. I went through how to get on the Photos app, swipe through their photos and add a heart (favourite) to their chosen pic.

I learnt from the first class I needed to be a wee more explicit in my instruction. many students chose their favourite photo, regardless of who took it. I explained that if you took the photo, the photo is yours. I wanted their favourite photo that THEY took.

Once they both had their favourite, they came up to me at my desk. I had the Prep folder open on my desktop, which was mirrored on the TV nice and big for them to see. As each pair handed me their iPad, I quickly selected the photos from the favourite album, uploaded them to Google Drive, in the Prep folder. Within moments they saw their photo up their on the TV. Once I got through everyone’s, I did a little slideshow with some positive commentry about each image.

Next week, we will take a field trip to the junior school play area and look at taking photos of surroundings, rather than people.

PHOTOSHOPMIX

Last year, I started Genius Hour in my class. Genuis Hour is a classroom version of the time Google gives their employees to work on their own passion projects within the working week. Search for Genius Hour on the net, and you’ll get lots of articles from educators who allow their students an hour a day to learn about what they want to learn about. In my class, there were only two conditions. Whatever it was they did, they had to be learning something they didn’t know before, and they had to be “creating” something – not just playing.

Some kids discovered PhotoshopMix which I had put on the iPads. PhotoshopMix is the Adobe mobile app that lets you create composites on the iPad. The idea is very simple. Import photos, select away the background, bring other pictures in on seperate layers, and then blend them together. Here’s a video Adobe put out.

It’s a free app. I didn’t do much in the way of explaining how to use the app, the students discovered this on their own. Below are three of my favourite composites the students came up with.

So, since I’ve been working on Photoshop CC with the Grades 3-6s, I wanted the Grade 1-2s to be able to do the same sort of thing but on the desktop. PhotoshopMix was the obvious choice.

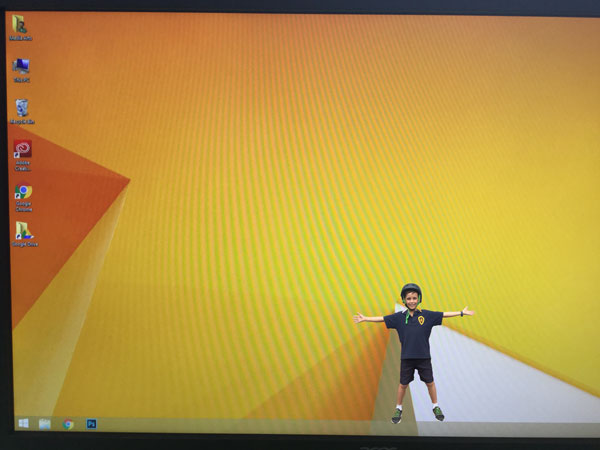
I gave them the example of taking a photo of a computer screen desktop and then taking a photo of a student. I then composited them together. First, you use the “smart brush” to paint in the area you want to keep – ie: the student, then you switch to the “basic brush” and choose to subtract from the selection. Then I modelled how to zoom in and check all the edges. Paint out what you don’t want, switch to the addition selection, paint back in what you do.

comp

You might notice, this is quite similar to what they did last week with the ColorSplash app. The skills they practised doing that served them very well doing this.

Today was really about playing with the app. I have plans for next week where they will start on a composite project that will tie into their Inquiry topics.

PHOTOSHOP CC – MAKING SELECTIONS

This week starts a three week unit on Composites. Composites are basically images blended with other images. Tying in with last week’s lesson on layers in Photoshop, I wanted the grade 3-6s to start getting used to selecting a background, and deleting it in a layer so that the subject is on a transparent background. From there, next week, we will get into students coming up with their own creative ideas and utilising the skills they learn in making their composites.

So, in order to engage them, I presented them with a series of superhero pictures I found. Starting with the Superman one (below), showing the students how to use the Quick Selection brush to paint the background selection, then unlocking the layer, and deleting the background.

superman

I chose this one to start with on purpose because it’s so easy. A flat, white, simple background, contrasting heavily with the subject, means that Photoshop can almost automatically find the background on it’s own.

After I modelled how to use the tool (adding and subtracting a selection, changing the brush size, using Quick Mask) I got them to have a go using it for Superman and once they showed me they could do the simple one, I had a series of other superhero ones for them to work on that were significantly harder (see below).

spiderman

An image like this one of Spiderman, has it’s own complications. It’s not a flat simple background colour. It’s “busy”. It needs a lot of attention to zoom in and make sure that the edges are well selected. This was a struggle for most students, but that’s ok. It’s a struggle for adults to do it properly.

Next week the students will come up with their own composite ideas, take the photos, and blend image on top of image.

All Hail The Lightroom Savior

It seems I always root for the underdog – technologically speaking. My favourite program that Microsoft puts out is OneNote, probably the least well known of all their programs. OneNote is a program that lets you keep notes and collate information into a digital binder.

For me, with the Adobe apps, I’ve always loved Lightroom. Again, not well known outside the photographer industry. It’s like Photoshop-lite in a way, because there are many photographic adjustments you can do, similar to Photoshop. But it’s the organiser part that really gets me excited. Collections, Smart Collections, tagging, keywording, metadata, ratings, flags, ratings based on flags, flags based on ratings, Smart Collections based on all of these, some of these, or just one of things. This is really what I get nerdy about.

lightroom

Maybe it’s not the underdog of these two that appeals. Maybe it’s the organisation. Digitally, I’m quite particular about how things are organised on my computer and my devices. I take a lot of pains for everything to be just so (“Nothing like in real life then!” – Wife), so it’s probably the organisational nature of these apps that appeal so much.

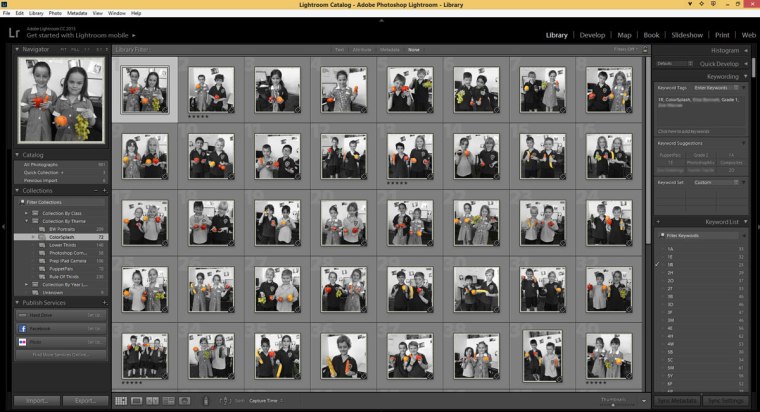
Ok, so we’ve established I know, and love, and use Lightroom a lot. My epiphany happened as I was looking through photos the classes had done. It suddenly struck me, these pictures should be tagged and collated in Lightroom. Tag them with their names, class name, year level, project name, app name. So for example, one photo might have several tags – John Doe, Jane Doe, 3A, Grade 3, Lower Thirds, Photoshop.

I can then create Smart Collections based on these tags. So a Smart Collection with the tag 3A will show up all the work done from 3A. A Smart Collection with the tag Lower Thirds will show all students work, regardless of grade level or class, that has done a Lower Third.

lightroom2

The problem I had was I wanted to import the entire school database – that’s every child’s name – into Lightroom. Usually with keywords you type them in like this “John Doe, Photoshop” but the best the office could give me was a CSV file in Excel that had the students names in columns. I managed to merge cells, copy and paste into a text document, until I had all names in, but it wasn’t easy. Now when I start tagging a photo and start typing a name, it will come up because it was in the Lightroom database.

Why go to all this trouble? Well, when it comes time to write reports, I can just look up a student’s name, and whether it’s a photo or a video, it will come filter the entire catalog with just their work. Brilliant! It’s the digital version of going through workbooks and finding the students’ work to assess. Love it.

I’ve also started a section in the school newsletter called Media Arts Student of the Week. So, when I go through the week’s work, I’ll 5-star any worthy recipients, and look at it that way.

masow

So, it took a long while to set up, and it takes a while to do it each week and tag all the work, but it will definitely have benefits in the long run.

All hail Lightroom – the ultimate classroom management tool for Media Arts teachers!

Week 4: PuppetPals #3, ColorSplash & Adobe Photoshop

This week, the Prep class finished their PuppetPals project, The Grade 1-2s used ColorSplash to paint colour back into a photo, and the Grade 3-6s were introduced to Photoshop Desktop, creating lower third captions to photos. I’ll start with PuppetPals, then on to ColorSplash and finally Photoshop at the end of the post.

PUPPETPALS HD #3

So because of last week, the Preps (unlike the Grade 1-2s) had to finish their project on PuppetPals. We did a refresher on what they were supposed to do (introduce each other on PuppetPals using some key “get-to-know-you” questions) and then gave them the time to complete. Many students needed a lot of support in doing this – mainly due to an ability to focus on the given task – so in some cases I had to have my finger on their ipad record/pause button, as they went through each question. The results were varied, but the core skill of telling a story using a digital tool is definitely there. Here is an example of one of the Prep videos below.

COLORSPLASH

Excuse the American spelling. I like to keep the spelling as the app is called so people can track it down.

I’ve known about ColorSplash for a while now, and have been excited to try it out on students. Basically, it’s an app that allows you to either take a photo or import one in, turn it black and white, and then get you to paint the colour back in to any given area. I thought this would be an excellent way to highlight focus in a photo, so I tied it into “Healthy Choices” – which was technically only the Grade 1 topic for the term, but I stretched it to the Grade 2s as well.

I went out and bought a variety of fruit and vegetables from the supermarket. I asked the students in their pair groups to select a few and then pose for a photo (which, due to time and practicality, I took for them). They then were tasked with painting the colour back in, but only on the food, to highlight the healthy choices you can make with food.

I spent a little time modelling how to do this in the class. I showed how you can zoom into the photo using the pinch gesture, how to paint carefully around and inside the object, and how to switch back to the black and white brush to refine and edit any mistakes. The photo on the iPad retains the colour information, even if it’s not visible, so the students didn’t need to pick out colours, they just needed to use their fingers to paint the colour back in.

I was impressed how careful the students were in trying to do the best job possible. The photos came out quite well. When they were done, they handed the iPad to me, I gave them some feedback – sent them back if I think they needed to do further work – then uploaded them into their class’ Google Drive folder so we could share them at the end of the lesson. Below are some examples from the Grade 1 & 2s. (P.S – The Instagramy border and crop was done by me)

INTRODUCING PHOTOSHOP – LOWER THIRDS

An aside, first.

As much as possible, I try to use Adobe tools where I can. Thanks to the new agreement between the Victorian Education Department and Adobe, state schools can now subscribe to Adobe’s Creative Cloud suite of programs for a hugely subsidised rate. Full disclosure, I am an Adobe Education Leader, so part of that role is to promote and teach Adobe tools in the education system. So, I suppose, there’s a bit of politics involved there as well. But, I honestly believe that Adobe’s tools are brilliant at giving people license to be as creative as possible.

Not everyone agrees. A conversation with a friend of mine – a graphic designer – has stayed with me. He was very supportive and excited learning about my new specialist classes, but questioned the idea of using Adobe tools in the classroom. Adobe tools – take Photoshop as an example – are hugely complex, industry standard applications. His argument was that in using such tools, the students will spend more time learning how to use the tool, and less time being creative in it’s use. To him, it would be better to use simplified, cheaper programs that achieve much the same thing.

I completely see where he’s coming from. But there are a couple of arguments I’d make against that. Firstly, you don’t need to teach everything about Photoshop (to stay with that particular example) to still have a successful unit of lessons. In the same way that a child does not need to know every word in the English language to be able to read effectively. Secondly, I know Adobe tools. I’d hardly class myself as an expert, but why spend the time sourcing and then learning new tools, when the ones I really want are readily available. Thirdly, I know kids. I know how well they can adapt to technology. I went in confident that they would get there. Finally, and this comes from my principal, even at this age – it gives them valuable job skills. These are tools and techniques that professionals use. I teach with Adobe tools on the desktop from Grades 3-6. I can only imagine how well a student will be skilled when they’ve gone through four years of learning Photoshop, InDesign, Premiere and the like. It’s very exciting.

So, in introducing Photoshop – in which most students had heard of before – I thought the key thing to start is to talk about layers. Layers is central to how most things in Photoshop work. If you understand layers, you have a solid foundation to build upon.

So, I printed and laminated three sheets. One with a background photo, one with a rectangle shape and one with a layer of text. The key thing being that the last two layers were clear aside from what was on it. Putting the three together creates a composite. But the composite is made up of the three layers.

By showing them in a physical form, the students understood that layers together combine to form the piece of art or the composite they want to make.

I brought Photoshop up on the screen and gave them a quick tour of the interface. The menu bar, the tool bar, the options bar and the panels. I didn’t go through every little thing, obviously, but I did point out the tools they’d be using for this project, as well as the layer panel and the properties panel. In reflection, I probably should have pointed out the history panel as well, so they knew where to go if they needed to go back and fix mistakes.

We then talked about what a lower third was, an industry term that refers to (often) boxed information on the lower part of the screen (or the image).

I then explained I wanted them to caption an image using the shape tool to draw out a rectangle, the type tool to write some text, and then the move tool to position them together. I also talked about formatting options, such as rounding the rectangle corners, creating a drop shadow, how to change the font, the text size and fill as well.

For the grade 3-4s that’s as far as I went. The grade 5-6s I also mentioned how to use opacity on the shape layer to give it a slightly transparent look. I also showed them how to unlink the corners of the rectangle, so that they could play around with the corners to see what looked good.

Most students didn’t finish this lesson, so I’ve extended it to next week’s lesson. Those that didn’t finish didn’t have much to do, so I will still go ahead with the new project next week as well.

Week 3: PuppetPals #2 & Black and White Portraiture

This week, the Prep – Grade 2s practised a story to tell on PuppetPals. The Grade 3-6s continued their unit on Photography, looking at Black and White Portraiture. I’ll start with PuppetPals and go through the Portraiture at the end of the post.

PUPPETPALS HD #2

I learned something about working with the little kids this week. Don’t give them too much at one time to handle. What I had planned was that I would give the students their topic to make up a story, and get them to go ahead and rehearse it (ie: tell the story on PuppetPals without recording) and then record it as a movie when they were done. This was too much for my brand new Prep class, so I simplified it.

For the Preps, we just had a discussion about their topic (simply, friends introducing each other) and some of the questions you might ask. For instance:

  1. What’s your name?
  2. How old are you?
  3. What’s your favourite colour?
  4. What’s your favourite healthy food?
  5. What’s your favourite non-healthy food?
  6. Who is your favourite teacher?

I got a Prep out to come and help me model the conversation, drilling in to everyone those six questions. I even had them up on the screen, which would help the readers amongst them remember. I then said, no iPads today, just have the conversation with your partner and have your answers ready for next week.

The same activity, with the Grade 1-2s, I was able to fit in the plan, the rehearse and record as planned. The Grade 2s, I further extended the task by getting them to take photos of themselves on the iPad, and using PuppetPals to “cut themselves out” so that they themselves could be characters in the PuppetPals play.

With the Prep topic being “All about Me”, the task was for two new friends to introduce themselves to each other. The Grade 1 and 2’s were doing “Healthy Choices” so we extended it to planning a birthday party. Who are you inviting? What activities do you want? And (most importantly) what balanced food will you have at your party?

This is a perfect example how, most of the time, I try to tie in the skill I’m teaching in Media Arts (in this case, storytelling with PuppetPals) to their Inquiry topic for the term. Below you can find an example from Grade 1 and Grade 2.

BLACK AND WHITE PORTRAITURE

I had a lot of fun with this series of classes. Doing it with the Grade 3-6s, we began by discussing what a portrait is. Some knew that portrait also refers to the rotation of a page. But everyone had the prior knowledge that a portrait is a drawing or painting (or photo!) of a person, usually just the shoulders and head.

I wasn’t bothered by how much of the student would be photographed, but we did discuss how the subject of the photo should be the star of the photo. You might take an amazing photo of a playground with someone by themselves playing, but unless they are prominantly featured in the foreground, it’s not a proper portrait. We looked at examples of good portraits – but after the first day I always ended up with showing a picture that a Grade 4 student took.

Ava

This blew me away. Not just because I thought it was a beautifully natural photo, with the monochrome filters used evenly and not heavy handed, and not just because I thought the balance between foreground (subject) and background was perfect, but because this particular girl’s partner was away that day. Whereas everyone else had a partner to photograph, she chose to take a selfie. That’s right, this picture is a self portrait, and an amazing one at that.

For the black and white side of things, I used an app called Simply B&W. I told the students I wouldn’t make it as simple as pressing one button to convert to black and white, I wanted them to make adjustment choices. I demonstrated starting off with a preset, the brightness, contrast and grain, as well as border and vignette. Then they all went out to take the photos, then come back in to process them through the app and upload it to Google Drive so I could share them with the class.

They really took it seriously. There were some amazing photos. Here are a selection.

Setting Up the Virtual Space

Before I get into each week and the lessons I have taught, I thought I would do a quick note on how I set up my virtual workspace (ie: organisation) for the kids to access their work.

So, this is what I have. 13 Windows desktops – spaced for two students on a desktop (occassionally three if we have a big class). I also have 12 iPads.

I decided to go with Google Drive. I set up Google Drive on each iPad as well as on each PC. I created a Media Arts account, and logged each device on to that.

(I have my own personal Google Drive. I shared the Media Arts root folder with my personal account, so I can have easy access to all of that, plus my own stuff as well. Down the line, I might have to get the school to pay for extra capacity, but for right now, it’s fine.)

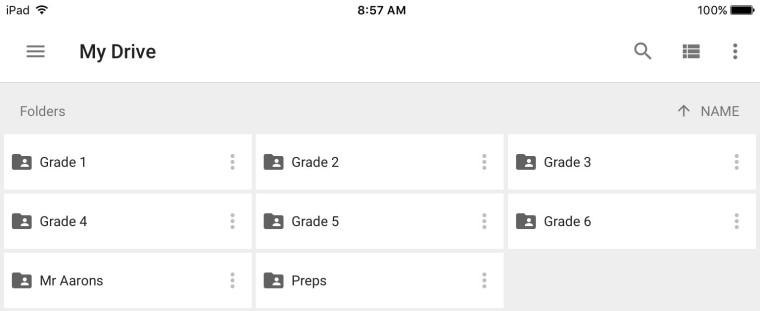
Inside that Media Arts account on Google Drive, I have folders for each year level (Foundation, Grade 1, Grade 2, Grade 3, Grade 4, Grade 5, Grade 6) and inside that a folder for each individal class.

GoogleDrive

When the students take photos or create videos on the iPad, we save them into Google Drive and into the approrpriate class folder. With the older kids (Grade 3 – Grade 6) I show them how to do this themselves, but with the younger kids, I get them to bring up their iPads and I do it for them.

For the computers, I have a Google Drive shortcut saved on the desktop, as well as saved in the Favourites folder list so they have easy access to it.

Right now, that’s how I’ve got it working. Will keep you updated to see how it pans out.

Planning The Year Ahead

So the year finally came to an end. The room well on it’s way to being set up. It was now time to contemplate all I had to do. I had to plan a series of units – from Prep to Grade 6 – from scratch. I had the new curriculum as a framework, but I had nothing to look back on, no skills to build up and no experience to fall back on. This is a new subject to primary school kids, and I had to justify the faith in which the school had placed on me.

thinking-clipart-3

There were a few of those points flitting about in my brain that I had to now bring together.

  1. I wanted to include Adobe tools in there. Desktop apps for the older kids, but certainly there is a plethora of fantastic tools such as Voice, Slate, Photoshop Mix, Photoshop Fix, Capture and the new kid on the block – Post. These apps are top notch.
  2. I don’t want to solely rely on Adobe tools. One of the main components of media arts is to communicate an idea or a story using digital means. An app that is very popular with my 3 year old girl is called PuppetPals HD. I’m so lucky I have her as a benchmark, because if she can make something work, there is no reason why the average Prep student couldn’t also.
  3. The curriculum is – for the most part – framed in composite year levels. Which means Prep, 1-2s, 3-4s and 5-6s. This is back to the old VELS way of doing things and quite different to the National Curriculum or even the AusVELS which had the curriculum set out in single year levels. Our school has been structured as single year levels for a few years now. I don’t see it going back, so I need to essentially split up a composite level (1-2s for example) into Grade 1 and Grade 2.
  4. As I mentioned before, every student is starting from scratch, pretty much. None of them have experience with planning a photography project. Virtually none of them have used Adobe apps before. None of them know what a composite is, or a filter. Very few of them have any in depth experience in editing videos and audio, much less properly planning and shooting one. This means everyone is starting from scratch, from square 1.
  5. None of the kids (or many of the teachers and parents come to that) have a clear idea of what Media Arts is. I’m still getting my head around it as well. I know what it isn’t – and that’s pretty important to set out from the beginning.
  6. Apart from the kids now in Grade 5, every other year I have taught have moved on to high school. Which means, I have to get to know virtually EVERYONE! I feel like a brand new teacher.

So, a lot to think about. To start with, this year, I plan to teach the 1-2s the exact same thing. Same with the 3-4s and the 5-6s. Once we’ve gotten through the first year, I then have space to build on as they progress to the next year and the next level.

I think that, for the most part, I will limit the Prep – 2s to work on iPads, with the older kids using iPads and Desktops. I don’t see it as my role to teach ICT. I would hope, by the time a child is in third grade, they would have some understanding of how to navigate and use a desktop environment (in our case, Windows PCs).

I plan to have everyone work in pairs. I don’t have enough machines for them to work separately, but I also want them to work in teams. The pairs will remain the same throughout the term. I’ll mix it up next term.

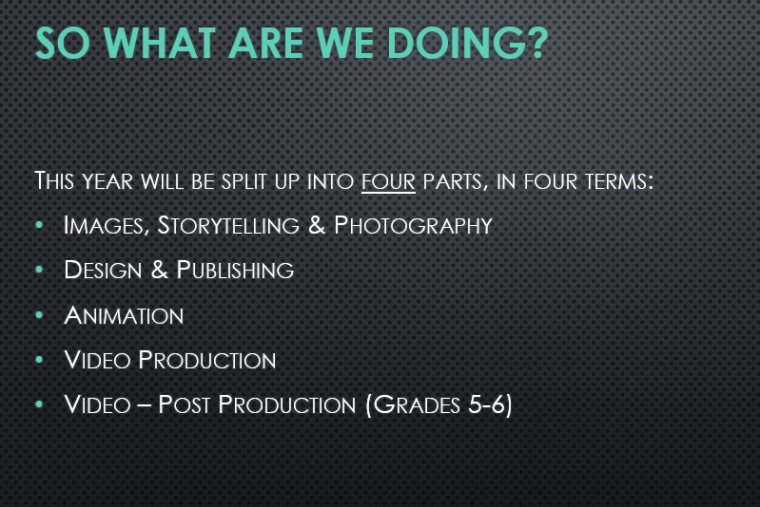
I will split the year up into four units. It will look almost identical (as far as WHAT they are learning) for all the kids in the school. The difference is in HOW they learn it, and my expectations also increase with the older students.

This is how I broke it down:

plan
A slide from my presentation to the kids – “What is Media Arts?”

The main difference being, for the grade five and sixes, they will skip the animation component in term 3 and go straight into video production. Then in term 4 they will go in post production skills (titles, subtitles, special effects, audio mixing, etc).

The idea is that by the end of the second term (in the first semester) they can work on a mini project that brings together the photography and design. This I can use for the major assessment in their reports. Then, in the second semester, they can use their new skills in animation and video production to deliver a short film that will be their assessment piece for the end of the year.

The last thing – in particular to me working in my school – is that with our school now granted status as an International Baccalaureate candidate school with the PYP (Primary Years Program) I had to think of how to make genuine and meaningful links to the students Inquiry in their classrooms, based on their central questions and wonderings. For me, that meant finding out what they are exploring in each year level, and where possible, using those topics to fuel the output of what the students come up with. For example, the Prep students start the year looking at themselves and their place in our world. So I will use that for future project ideas.

So, before everyone comes back from holidays, this is the rough plan I have for term one. Bear in mind that, the first week of school (in actuality it’s only two days) the students do not have specialist classes. I start from Week 2.

Experience tells me that I fully expect this to change after the first week, as I get to know how far I can push the kids. Some lessons might need longer that one session, so sacrifices will have to be made. But no problems, I can always move that to next year’s planner down the road.